[NLP] Transformer의 Attention Head 파이썬으로 정리
미루고 미루다 다시 한 번 Transformer 구조 정리를 시작하고자 한다.
이번 포스팅에선 Attention Head와 Scaled-dot Product Attention을 파이썬 코드와 함께 정리해보고자 한다.
-이전 포스팅-
https://tiabet0929.tistory.com/66
[NLP] Transformer의 Positional Encoding 정리
이번 포스팅에선 Positional Encoding과 Embedding에 대해 정리해보고자 한다. 더보기https://tiabet0929.tistory.com/68 [NLP] 트랜스포머 구조 파악하기 (Attention is All You Need)드디어 오랜 시간 공부해온 트랜스포
tiabet0929.tistory.com
https://tiabet0929.tistory.com/67
[NLP] Transformer의 Input은 어떻게 Embedding Vector로 변환되나?
https://tiabet0929.tistory.com/68 [NLP] 트랜스포머 구조 파악하기 (Attention is All You Need)드디어 오랜 시간 공부해온 트랜스포머에 대해서 정리할 수 있을 정도로 개념이 쌓인 것 같다. 그래서 순차적으로
tiabet0929.tistory.com
https://tiabet0929.tistory.com/68
[NLP] 트랜스포머 구조 파악하기 (Attention is All You Need)
드디어 오랜 시간 공부해온 트랜스포머에 대해서 정리할 수 있을 정도로 개념이 쌓인 것 같다. 그래서 순차적으로 쭉 자세히 정리해보려고 하는데, 인트로 느낌으로 논문 리뷰를 하면 좋을 것
tiabet0929.tistory.com
https://tiabet0929.tistory.com/69
[NLP] Transformer의 Attnetion 간단한 정리
https://arxiv.org/abs/1706.03762 Attention Is All You NeedThe dominant sequence transduction models are based on complex recurrent or convolutional neural networks in an encoder-decoder configuration. The best performing models also connect the encoder an
tiabet0929.tistory.com
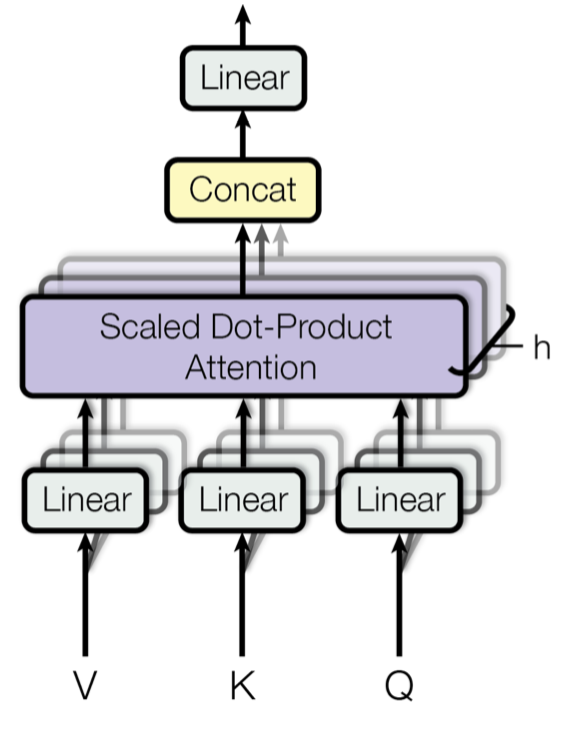
Attention 계산을 실행하는 Attention Head
사실 Tranformer 구조에서 가장 중요한 기능이자, 이전까지는 볼 수 없었던 차별화된 점이 바로 Attnetion Head이기 때문에, Transformer = Attention Head라고 개인적으로는 생각하고 있다. 인코더-디코더 구조는 이전 RNN, LSTM 같은 모델로도 사용했기 때문.
Attnetion Head는 그 이름에도 알 수 있듯이 Attention 매커니즘을 활용한 계산이 이루어지는 단계이다.
https://tiabet0929.tistory.com/45
[NLP Study] - Attention Mechanism이 특별한 이유
사실상 세상을 바꾼 아키텍쳐라고 봐도 무방한 트랜스포머의 어텐션 매커니즘에 대해서 정리해보고자 한다. 참고자료 https://wikidocs.net/22893 15-01 어텐션 메커니즘 (Attention Mechanism) 앞서 배운 seq2se
tiabet0929.tistory.com
Attention 매커니즘은 이전에 정리해놓은 포스팅이 있어서 본 포스팅에선 그 자세한 설명은 생략하기로 한다.
Attention Head 코드로 이해하기
요즘은 기업들을 포함해서 세상 모두가 ChatGPT로 코딩을 하는 것이 자연스러운 시대라서 포스팅할 때 양심의 가책이 줄어든다. ChatGPT에게 AttentionHead 코드를 Pytorch로 만들어달라고 부탁했다. (Single Attention Head)
import torch
import torch.nn as nn
import torch.nn.functional as F

class AttentionHead(nn.Module):
    def __init__(self, embed_dim, head_dim):
        super(AttentionHead, self).__init__()
        self.embed_dim = embed_dim  # Input embedding dimension
        self.head_dim = head_dim    # Dimension of each attention head

        # Linear layers for query, key, and value
        self.query = nn.Linear(embed_dim, head_dim, bias=False)
        self.key = nn.Linear(embed_dim, head_dim, bias=False)
        self.value = nn.Linear(embed_dim, head_dim, bias=False)

        # Output linear layer to combine the attended result
        self.out_proj = nn.Linear(head_dim, embed_dim, bias=False)

    def scaled_dot_product_attention(self, Q, K, V, mask=None):
        # Calculate QK^T / sqrt(d_k)
        d_k = K.size(-1)  # Head dimension for scaling
        scores = torch.matmul(Q, K.transpose(-2, -1)) / torch.sqrt(torch.tensor(d_k, dtype=torch.float32))

        # Apply optional mask (useful for causal/self-attention)
        if mask is not None:
            scores = scores.masked_fill(mask == 0, float('-inf'))

        # Apply softmax to get attention weights
        attention_weights = F.softmax(scores, dim=-1)

        # Multiply with V to get the final attention output
        output = torch.matmul(attention_weights, V)
        return output, attention_weights

    def forward(self, x, mask=None):
        # Generate query, key, and value matrices
        Q = self.query(x)
        K = self.key(x)
        V = self.value(x)

        # Apply scaled dot-product attention
        attention_output, attention_weights = self.scaled_dot_product_attention(Q, K, V, mask)

        # Project the attention output back to the embedding dimension
        output = self.out_proj(attention_output)

        return output, attention_weights
하나하나 차근차근 뜯어보자.
    def __init__(self, embed_dim, head_dim):
        super(AttentionHead, self).__init__()
        self.embed_dim = embed_dim  # Input embedding dimension
        self.head_dim = head_dim    # Dimension of each attention head

        # Linear layers for query, key, and value
        self.query = nn.Linear(embed_dim, head_dim, bias=False)
        self.key = nn.Linear(embed_dim, head_dim, bias=False)
        self.value = nn.Linear(embed_dim, head_dim, bias=False)

        # Output linear layer to combine the attended result
        self.out_proj = nn.Linear(head_dim, embed_dim, bias=False)
우선 모델의 차원인 Embedding Dimension 을 embed_dim으로, Attention Head의 Dimension을 head_dim으로 선언해준 모습이다. embed_dim과 head_dim의 관계에는 필연적인 것은 없다. 하지만 보통 Embedding Dimension이 몇백, 많으면 천이 넘어가기도 하고, Transformer는 일반적으로 Multi-Head Attention을 사용하는 상황임을 감안하면, embed_dim이 head_dim보다 작으면 안 될 것이다.
다음으로 Query, Key, Value 행렬을 만들기 위한 가중치들을 nn.Linear로 만들어준다.
https://pytorch.org/docs/stable/generated/torch.nn.Linear.html
Linear — PyTorch 2.5 documentation
Shortcuts
pytorch.org
Pytroch의 nn의 Linear 함수는 아주 편리하게 행렬곱을 진행하게 해주는 함수다. 내가 편리하다고 느낀 점은 Linear를 생성하는 데에 필요한 파라미터에 있다. 사실 Tensorflow의 Dense는 약간 직관적이지 않다는 점이 불편하다.
홈페이지의 예제만 보고 한 번 살펴보자.
>>> # Create a `Sequential` model and add a Dense layer as the first layer.
>>> model = tf.keras.models.Sequential()
>>> model.add(tf.keras.Input(shape=(16,)))
>>> model.add(tf.keras.layers.Dense(32, activation='relu'))
>>> # Now the model will take as input arrays of shape (None, 16)
>>> # and output arrays of shape (None, 32).
>>> # Note that after the first layer, you don't need to specify
>>> # the size of the input anymore:
>>> model.add(tf.keras.layers.Dense(32))
>>> model.output_shape
https://keras.io/2.15/api/layers/core_layers/dense/ 에 들어가서 예제 코드를 가져와봤다.
보면 알겠지만 Tensorflow의 Dense는 단순히 Output의 Dimension만을 적어주고 끝나서, 이 layer가 몇 개 차원을 Input으로 받는지는 확인이 안 된다.
>>> m = nn.Linear(20, 30)
>>> input = torch.randn(128, 20)
>>> output = m(input)
>>> print(output.size())
torch.Size([128, 30])
https://pytorch.org/docs/stable/generated/torch.nn.Linear.html
반면 Pytorch의 Linear 함수는 정확히 몇 개의 차원을 Input으로 받고 Output으로 돌려주는지를 정확하게 명시해주고 있다. 그래서 저 Linear로 만들어진 m이라는 객체 안에 20*30 행렬이 들어있다는 것이 직관적으로 이해가 된다.
뭐 물론 Dense 함수는 activation 함수도 함께 설정할 수 있고 기능이 여러 가지가 있다. 하지만 이런 기능도 여러 개를 쓰다 보면 직관적이지 않아지기 마련이어서, 개인적으로는 Pytorch의 직관성 때문에 더 선호되는 것 같다.
잡설이 너무 길어져서, 다시 Query와 Key, Value 얘기로 넘어가보자.
    def __init__(self, embed_dim, head_dim):
        super(AttentionHead, self).__init__()
        self.embed_dim = embed_dim  # Input embedding dimension
        self.head_dim = head_dim    # Dimension of each attention head

        # Linear layers for query, key, and value
        self.query = nn.Linear(embed_dim, head_dim, bias=False)
        self.key = nn.Linear(embed_dim, head_dim, bias=False)
        self.value = nn.Linear(embed_dim, head_dim, bias=False)

        # Output linear layer to combine the attended result
        self.out_proj = nn.Linear(head_dim, embed_dim, bias=False)
self에 qeury, key, value라는 객체를 생성하고, 이는 모두 embed_dim * embed_dim 크기인 행렬이 완성된다.
마지막으로 out_proj라는 객체에 다시 한 번 Linear를 만들어서 넣어주는데, 이 부분은 Single Attention Head 일 때만 유의미하므로 우선은 건너뛰겠다.
    def scaled_dot_product_attention(self, Q, K, V, mask=None):
        # Calculate QK^T / sqrt(d_k)
        d_k = K.size(-1)  # Head dimension for scaling
        scores = torch.matmul(Q, K.transpose(-2, -1)) / torch.sqrt(torch.tensor(d_k, dtype=torch.float32))

        # Apply optional mask (useful for causal/self-attention)
        if mask is not None:
            scores = scores.masked_fill(mask == 0, float('-inf'))

        # Apply softmax to get attention weights
        attention_weights = F.softmax(scores, dim=-1)

        # Multiply with V to get the final attention output
        output = torch.matmul(attention_weights, V)
        return output, attention_weights
다음으로 Attention 매커니즘을 구현한 코드이다. Transformer의 오리지널에서 사용된 Attention은 Scaled dot-Production Attention이다. (요즘은 이 기법도 굉장히 많이 발전한 것으로 안다.)
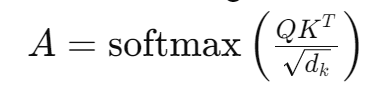
Attention Score라는 것을 계산하여 단어와 단어 사이의 관계를 면밀히 파악, 기계가 말을 더 잘 이해할 수 있게 한다는 것이 Transformer의 핵심이다. 위 식을 계산하기 위한 코드라고 보면 된다. d_k는 한 번 스케일링해주는 과정이고, Q와 K를 곱해줘야 하므로 Transpose 해준 것도 코드상으로 확인할 수 있다. transpose(-2,-1)을 해줘야만 행렬곱이 가능한데, torch의 matmul 함수 때문에 이걸 해줘야한다. matmul function까지 여기서 설명해버리면 너무 글이 길어져버릴 것 같아 여기선 생략한다.
scores를 계산하면 mask를 씌울거냐 말거냐를 결정해야하는데, 이는 디코더 레이어의 Masked Multi-Head Attention에서 필요한 과정이다. 이후 Softmax 함수에 한 번 씌우면, Attention Weight가 계산되고 이를 V와 곱해주면 최종적인 Attnetion 매커니즘 계산이 끝난다.
    def forward(self, x, mask=None):
        # Generate query, key, and value matrices
        Q = self.query(x)
        K = self.key(x)
        V = self.value(x)

        # Apply scaled dot-product attention
        attention_output, attention_weights = self.scaled_dot_product_attention(Q, K, V, mask)

        # Project the attention output back to the embedding dimension
        output = self.out_proj(attention_output)

        return output, attention_weights
이제 실제로 실행되는 forward 부분이다. query, key, value 행렬을 거쳐서 각각 다른 Q, K, V 행렬로 Input이 전환된다. 이들로 Attention 계산을 해주고, 이를 마지막에 모델의 차원과 맞춰주기 위해 out_proj를 거친다.
아까 설명을 건너뛰었는데, 마지막에 굳이 output layer를 거쳐서 다시 output을 구하는 이유는 이렇게 해야만 Multi-Head Attention에서 attention head들간의 관계 또한 학습을 할 수 있기 때문에 더 좋은 성능을 낼 수 있기 때문이라고 한다. 뭐 본 논문에서 이렇게 했으니 내 수준에선 별다른 이견을 제시할 수 없다.
이렇게 Attention head가 어떻게 동작하는지를 파이썬 코드와 함께 살펴봤다. 다음 포스팅에선 Multi-Head Attention과 본 포스팅에서 정리한 Single-Head Attention이 어떻게 다른지를 살펴보도록 하겠다.